I recently received a box of exposed photographic dry plates shot in the late 1800s. The plates, made by the M.A. Seed Dry Plate Company, are photographic negatives on glass since plastic didn’t exist at the time. We can date them because, in 1902, M.A. Seed became part of the burgeoning Eastman Kodak Company. Plates sold after 1902 would have borne the Kodak brand.
Remarkably, despite being around 130 years old, these plates have held up well. They were faded with age and showed some minor damage from handling and fungus. Each plate was meticulously cleaned and restored before being scanned.
Each plate was carefully inspected and cleaned using a solution that will not harm the delicate emulsion.
Once cleaned, each plate was placed on a special light source for digitizing negatives. The plate was then captured in a series of very close images spanning the entire surface of the plate. This resulted in a digital file equivalent to approximately 400 megapixels.
The focus peaking function (red) of the Fujifilm camera ensured extremely precise focus
Each high resolution digital image was then brought into ON-1 Photo Raw where it was carefully examined and using the wide variety of tools in ON-1 chunks of missing emulsion and scratches were repaired.
Finally each plate was printed to make a final hard copy of the image.
Here is a gallery of the plates. We don’t yet know who these people are. Their names may be lost to time, but we’ve had instances in the past where someone recognized a face, allowing us to eventually reunite the photographs with the descendants. It’s quite possible that these individuals were a family that lived in the Vancouver area around 1900.
If you have any tips or think you recognize anyone in these photos, please contact me.
This is one of the most common questions I am asked by my students. When was the best time to be a film photographer? Surely it must have been in the 70’s or 80’s at the peak of photography popularity among the general public.
Back in my early days of photography, I would shoot my roll of film and head straight into the darkroom. The film would be processed, and a contact sheet printed to determine which shots were worthy of printing. The next several hours would be spent making prints of my keepers. Once those prints were made, unless destined for a magazine or other publication, generally, the only ones who ever saw them were myself and maybe a few friends. Many of these prints were filed away in dusty albums, never seeing the light of day again.
Cameras were very expensive back then. A high-quality Nikon, Canon, Olympus, or Pentax SLR was comparable in price to a high quality camera today. Film was plentiful, and TV shows and magazines were filled with Kodak and Fujifilm advertisements. One-hour film processing shops seemed to be on every street corner. And film—oh my was it cheap! But was it really? I remember hearing photographers constantly lamenting about the price of film. Let’s talk about that in a bit.
In the 2010s, digital cameras stormed the market, causing film to fall out of popularity like a lead weight off a table. Camera companies retooled to produce digital cameras, and the phrase “Film is Dead” was everywhere. Kodak, Ilford, and Fujifilm drastically reduced production and canceled entire lines of film. But this wasn’t the end of the story.
Here we are in 2024. Entire generations have grown up in a heavily computerized era, where everything from the watch on your wrist to your refrigerator is digital. Machines make decisions for us as we go through our day. Even the art of photography has become heavily automated, with machines enhancing our images. These same generations are now longing for something that doesn’t involve a keyboard or voice interface. Many are picking up old film cameras, blowing the dust off, and shooting a roll. They are discovering film photography anew in the 2020s. They can make art themselves with just their brains, eyes, and hands. They can hold something in their hand that they truly created. This is unique and new for many and it’s spurring a fascination with film that is reinventing the entire industry.
How about film itself? As I type this post, I have a roll of Ilford HP4 (the predecessor of modern-day HP5) from 1979 sitting in front of me. It still has its original London Drugs price sticker of $1.75, which equates to roughly $8 in 2024. Today, a roll of HP5 costs $11 at London Drugs. So, film has indeed become a bit more expensive over 45 years, but not as drastically as some might think. Companies like Kodak and Ilford are struggling to meet customer demand, which is a good thing. Kodak has even reopened an entire factory that had been mothballed for years, and Ilford has expanded their manufacturing. We also have newcomers like Flicfilm, Cinestill and others, repurposing cine film into 35mm canisters for still photography. Some companies are even manufacturing new stocks of film or reviving old ones that were previously discontinued. In 2024, we arguably have more variety of film available than we did in the 1980s.
The market is also rich with beautiful old cameras at amazing prices. Today, you can buy a premium professional-grade SLR like a Nikon F2 for about $300-$400. Back in the day, that camera would have been out of reach for anyone but a working professional. In front of me, I have my Hasselblad 500cm and Leica M6. Both are top-tier cameras. In the 1970s, purchasing a Hasselblad would have cost roughly a year’s gross salary for the average person. It was far out of reach for the average hobbyist. While still expensive today, these cameras are now within reach for dedicated enthusiasts. The Leica M6 is similarly prestigious and costly. In the 1980s, owning even one of these cameras would have been unthinkable for me, much less both.
Let’s talk about processing and sharing. Today, I still have to process my film, either myself or at a photo lab. The corner one-hour photo shop is pretty much gone, but I still have a couple of labs within a few minutes’ drive. I choose to develop my film at home because it’s significantly cheaper, and I enjoy the process. Here is where a huge difference lies: back in the day, I would spend hours in the darkroom proofing my film and printing the chosen keepers. Today, I can scan or digitize the entire roll and handle them as digital images. This allows me to share my photos on social media or send them to friends and family anywhere in the world with the click of a button. While they are now digital, these images still retain the unique look and characteristics of film that digital still can’t accurately replicate. Occasionally, some of my images catch my eye, and I choose to take them into the darkroom for traditional wet processing. You don’t need a darkroom to enjoy processing your own film today. Hybrid photography processes the film in daylight and combines that with digital processing of the final images. The key difference is that today, I have choice! I can process my images entirely in a darkroom or entirely digital, or as in my case I can use a mix of the two. In addition I can share my images with an audience that would have been unimaginable in previous years. Every time I share a photo, it is seen by thousands on my social media accounts, and I engage in meaningful conversations about them. This level of exposure and interaction has never existed before in history.
So, when was the best time to be a film photographer? As someone who has been shooting film for 50 years, I can say without hesitation that the answer is today!
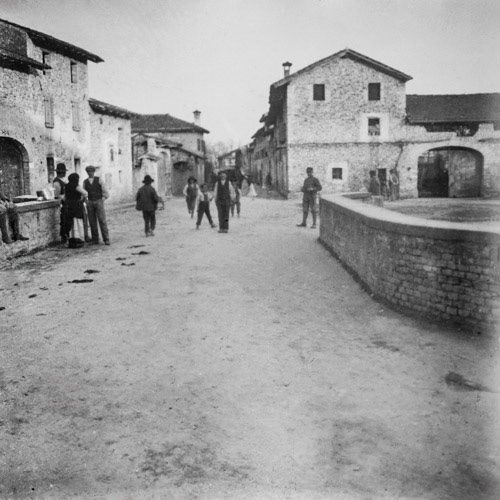
Embarking on an extraordinary journey, I find myself entrusted with a unique mission – the restoration of a small collection of photographic glass plates capturing life in the quaint village of San Lorenzo, Italy, around 1900. Discovered in Vancouver, Canada, these delicate artifacts hold within them the untold stories of a bygone era. The owners of this visual time capsule, have entrusted them temporarily to my care. My task is to delicately recover the images held on each fragile plate.
Preserving Fragile History:
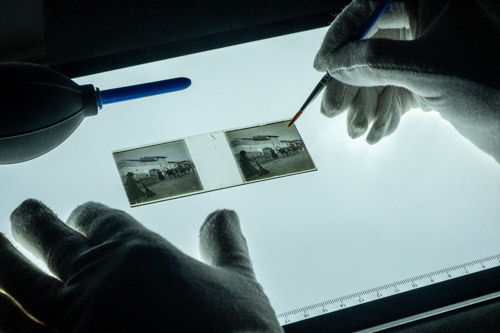
Handling these delicate glass plates becomes a dance between caution and passion. Each plate, adorned with scratches and missing emulsion, demands the utmost care. Dusting off the layers of time, I feel the weight of responsibility as I transport these fragile pieces into the present, preparing them for a journey through restoration.
Each plate was delicately cleaned
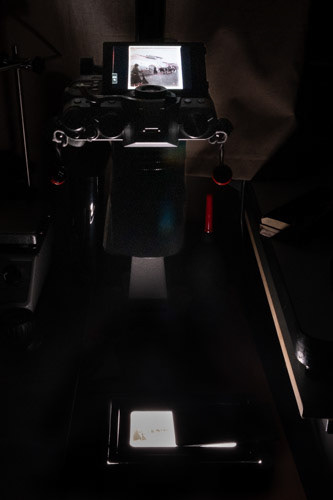
Next they were digitally scanned and processed
Plates were badly damaged and faded after more than a century. Each had to be laboriously restored one at a time.
Stereoscopic Wonders:
The uniqueness of this collection lies in its stereoscopic design, capturing dual images simultaneously. Armed with the necessary technology and a deep appreciation for the historical significance of each frame, I meticulously photograph both the left and right images from every plate. In the quiet solitude of my studio, these images become digital puzzle pieces waiting to be artfully overlaid, merging seamlessly. When the two images are merged, I am able to make the scratches and damage go away, telling the tale of San Lorenzo.
Before and After
The first image shows the scratches, dirt and missing chunks of emulsion. Once the pair of images are blended together, that damage can be removed leaving the undamaged image as shown on the right. If you would like to actually see this being done, I’ve created this short video clip.
Before retouching. Notice the scratches, discolouration, fading
After retouching all the damage. It’s still not perfect but we don’t want it to be. It was shot in 1900 after all.
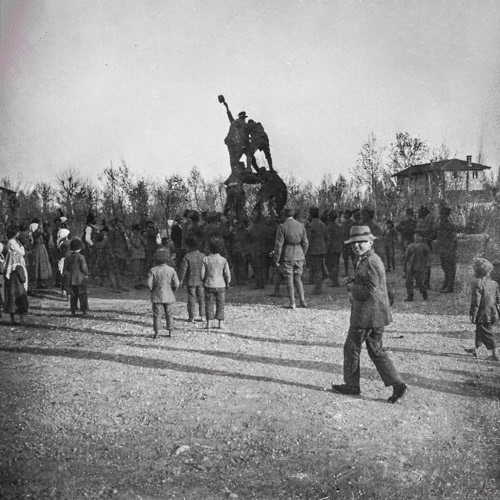
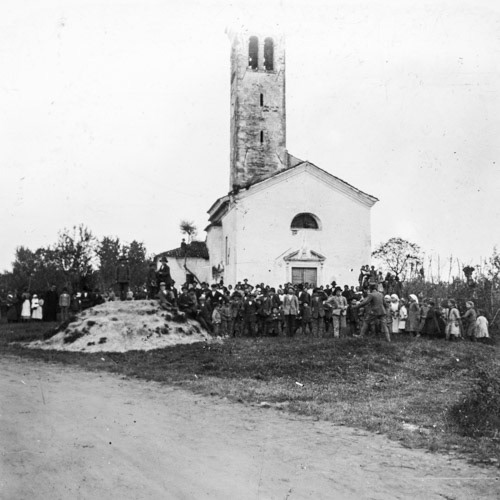
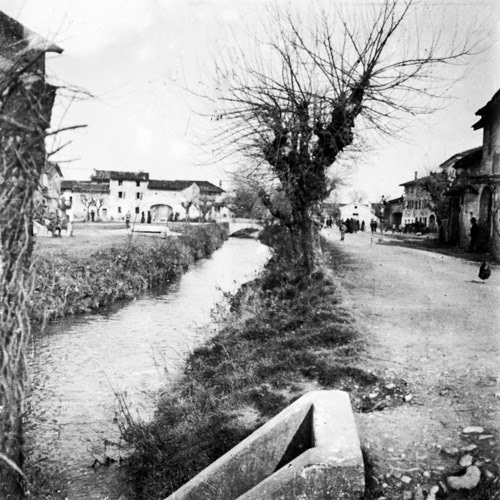
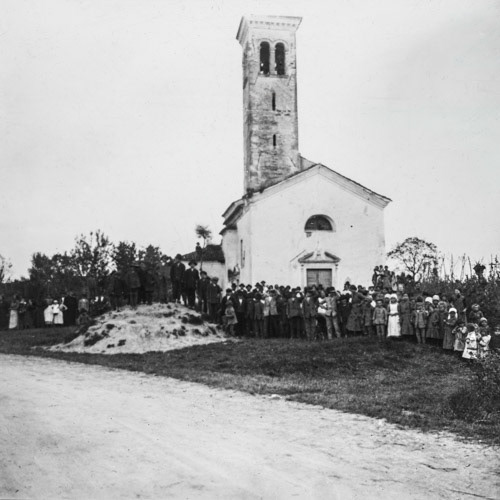
A Glimpse into San Lorenzo’s Past:
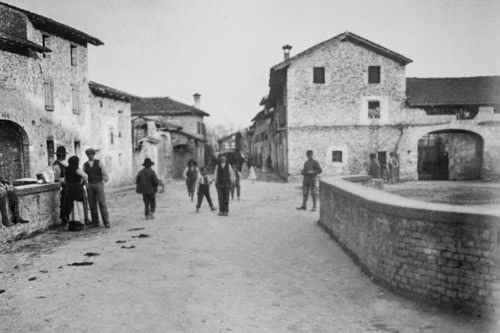
As the merged images come to life on my computer screen, the streets of San Lorenzo awaken with a vibrancy long forgotten. The smiles of children and adults, the horse-drawn wagons navigating dirt roads, and the absence of modern vehicles transport me to a simpler time. In every scratched surface and missing chunk of emulsion, I discover the marks of a community that once thrived in simplicity.
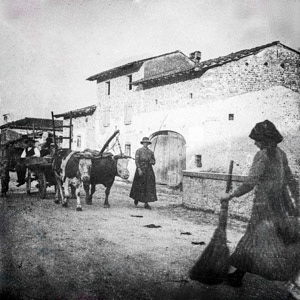
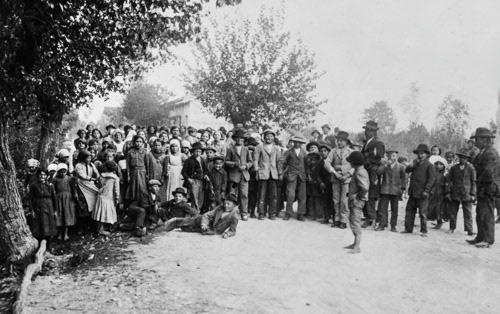
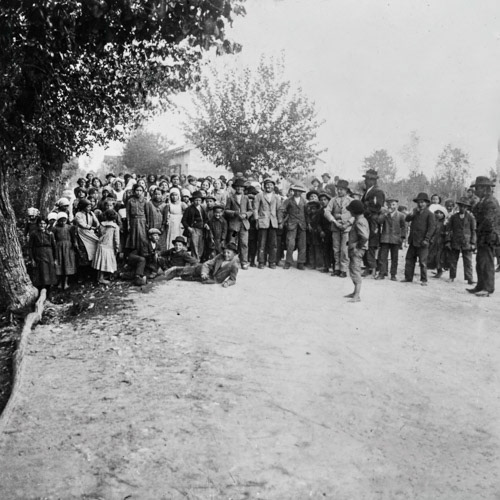
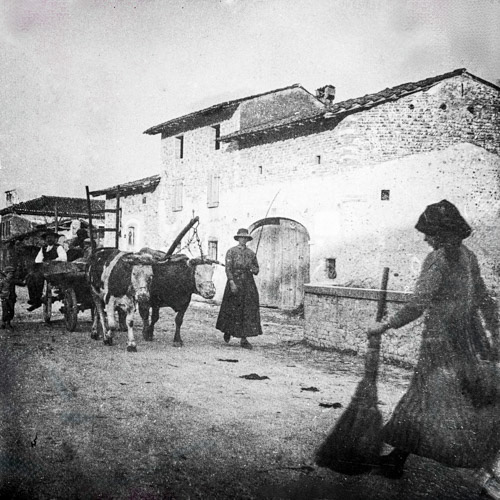
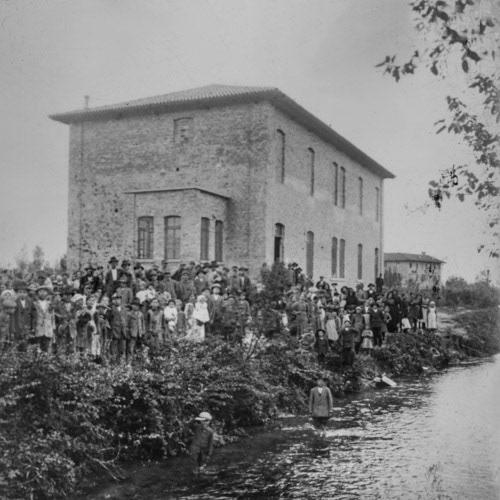
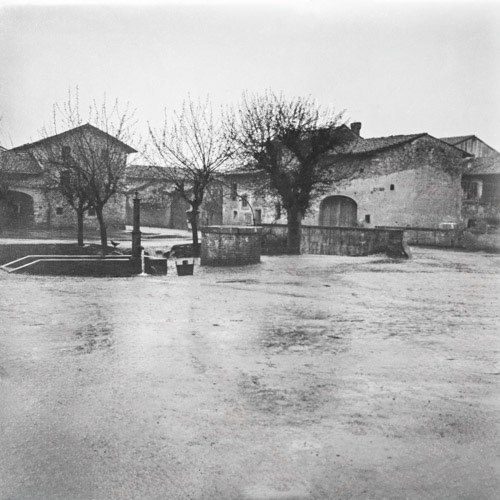
These images are from glass plate positives of San Lorenzo Italy around 1900
Simple Pleasures:
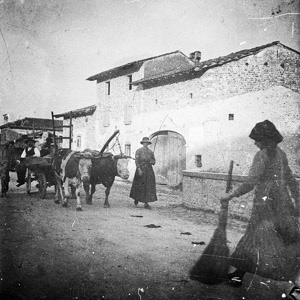
One photograph, in particular, draws me into the daily life of San Lorenzo. A woman, adorned in a long dress, guides her ox cart along the street, with her husband enjoying the leisurely ride on atop the wagon. The absence of motorized vehicles underscores a time when the rhythmic clattering of hooves and the patient plodding of oxen defined the pace of life.
These images are from glass plate positives of San Lorenzo Italy around 1900
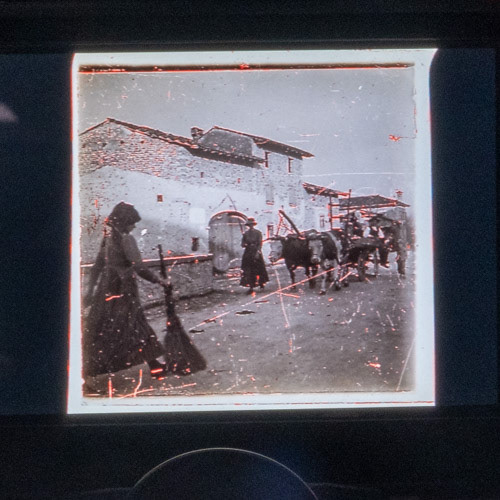
A Glimpse of Pre-War Life:
The presence of Italian soldiers scattered throughout the images hints at the imminent upheaval of World War I. Each soldier frozen in time becomes a silent witness to the community on the brink of historical transformation. These photographs not only capture smiles and simple pleasures but also foreshadow the challenges that lie ahead.
Notice the armed soldiers in this plate. WW1 is approaching.
Conclusion:
Restoring this collection of photographic glass plates has become a personal odyssey, an intimate exploration of a village frozen in time. With each scratch repaired and every missing piece delicately reconstructed, I feel a profound connection to the past. Through my lens and the digital canvas, San Lorenzo’s story unfolds, inviting us to appreciate the beauty of life in a small Italian village and the resilience of memories preserved through the art of restoration. The restored images are being returned to a historian for the village of San Lorenzo. More than a century later, they are going home.
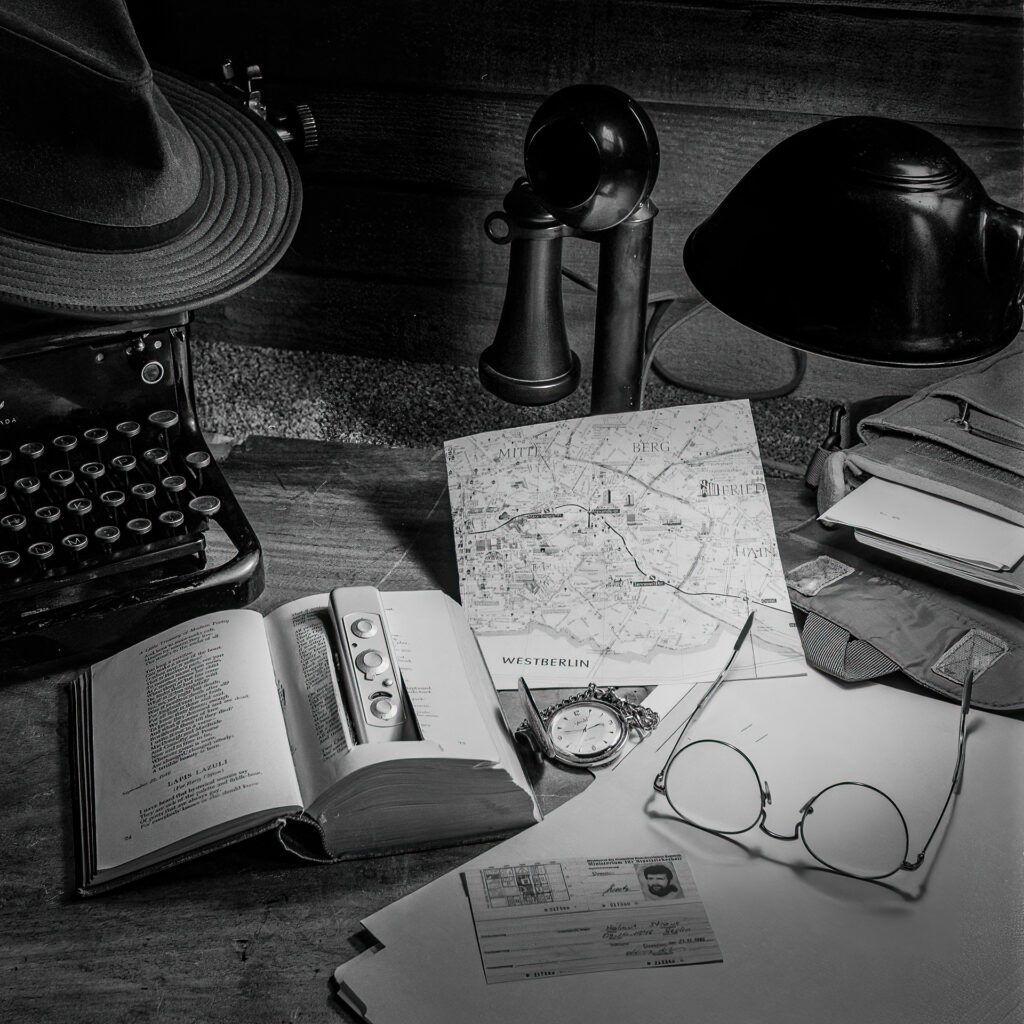
In the looming presence of the Berlin Wall, Helmut and Erika Straus navigated the intricate dance of Cold War politics in 1971. Their hunger for freedom ignited a daring escape plan, capitalizing on Helmut’s stature as a successful businessman with sporadic West-bound privileges granted by East German authorities.
As night settled over their humble East Berlin home, Erika clutched forged identity papers, the lifeline connecting them to a potential new life. Identified as Helmut’s secretary, these papers aimed to deceive the Stasi, securing Erika’s spot on the westward journey. The Stasi’s watchful eye demanded the illusion that Helmut’s wife remained at home, transforming she and all they possessed into stark assurances of Helmut’s return.
Anxiously, Erika carefully placed a handful of clothes into a worn suitcase, skillfully upholding the facade of a short absence. Simultaneously, Helmut chose items for his leather satchel, among them this special camera—a possession that, if uncovered, would undoubtedly jeopardize their lives. Erika had long pondered the purpose of this perilous device, yet every inquiry yielded Helmut’s terse reply: “It’s better for you not to know.”
As time pressed on, a tapestry of anticipation woven with threads of fear unfolded. Tomorrow, armed with forged papers and hope, they would approach the checkpoint. Sleep eluded them, the impending escape demanding they leave everything behind. Erika, well aware of the dire fate awaiting escapees, shuddered at the prospect of capture.
In the hushed pre-dawn moments, Helmut and Erika prepared to venture into the unknown, each step carrying the weight of freedom and the looming specter of danger.
Fast forward to 2023, and Erika, now in her 80s, weaves a captivating narrative with her German accent. She holds Helmuts’ tiny Minox spy camera delicately in one hand, while cradling a cup of tea in the other. Our backdrop is their stunning home, perched above the ocean in White Rock, Canada. Since Helmut’s passing several years ago, Erika, now living alone, graciously welcomes the opportunity to serve me tea. With a tender smile, she passes the camera to me, remarking, “Helmut would want it to find a home with someone who truly understands its significance.”
Today’s photograph serves as a poignant tribute to the enduring story of Helmut, Erika, and the unassuming camera that silently carried unknown secrets to the West.
This image photographed with Hasselblad 500cm and Ilford HP5 film
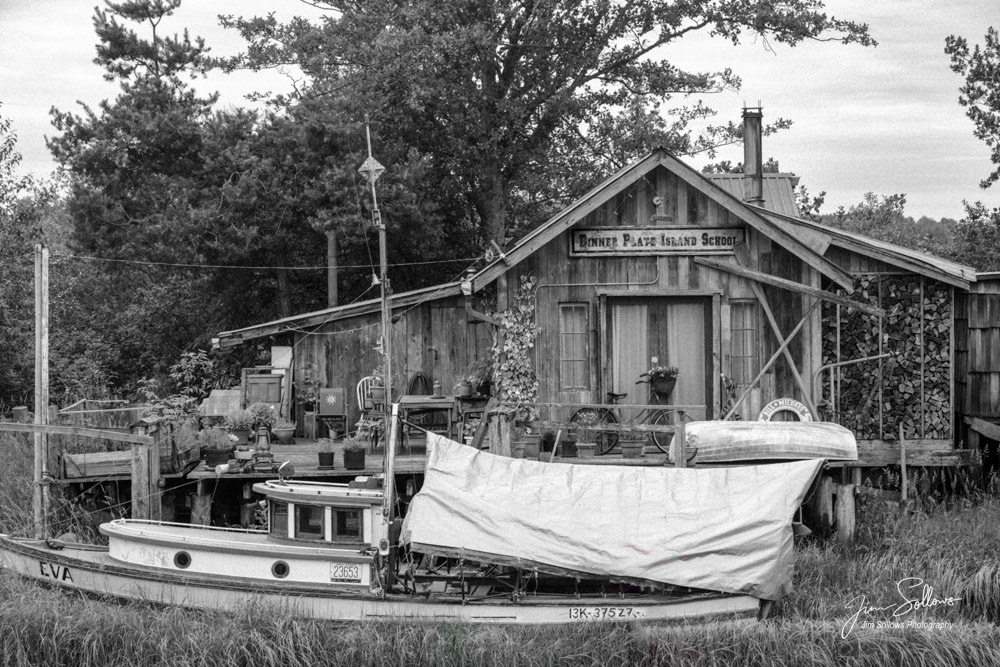
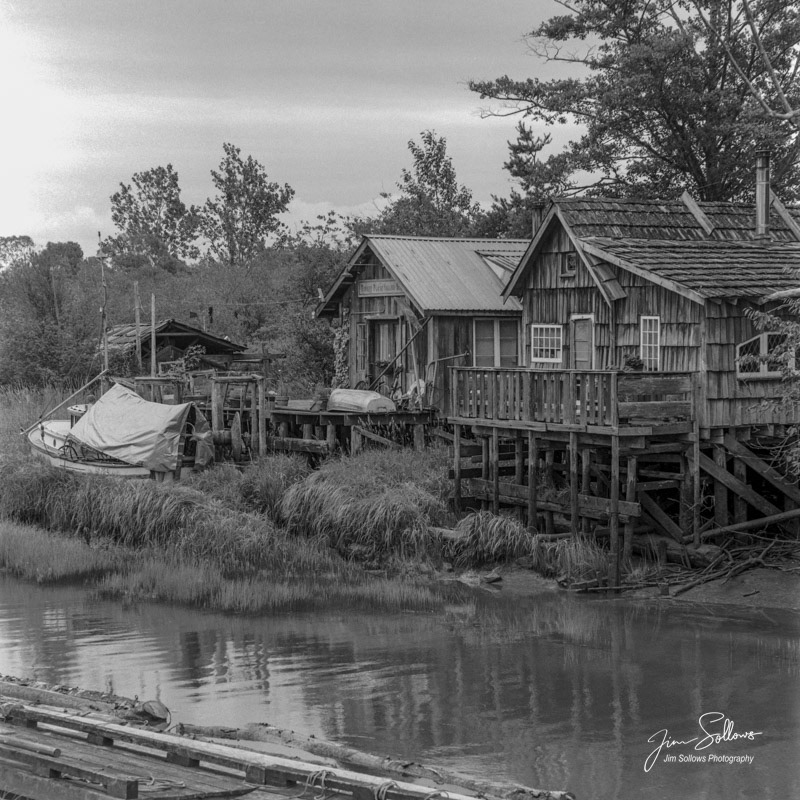
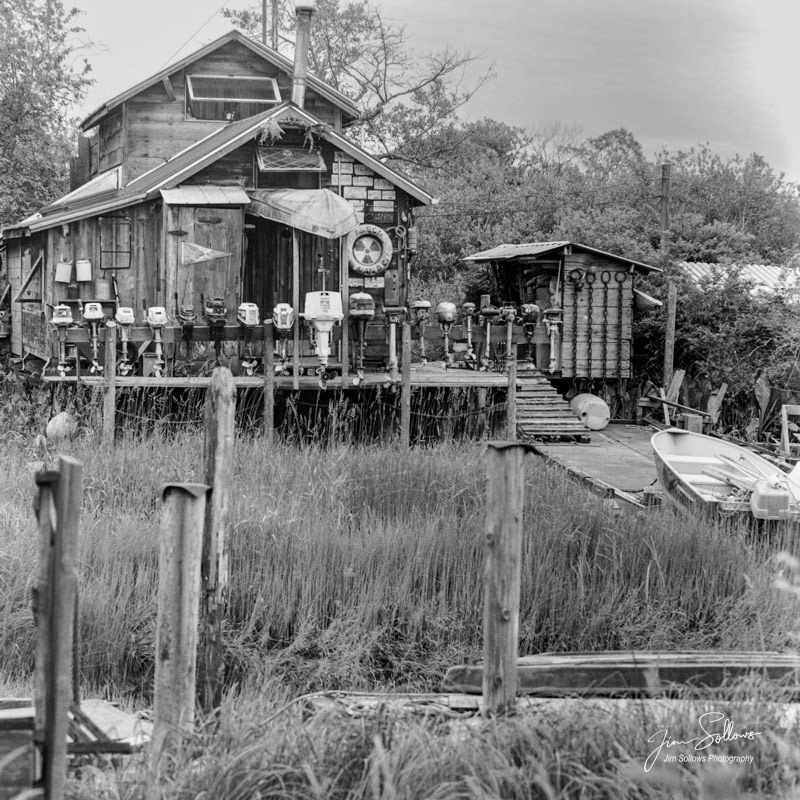
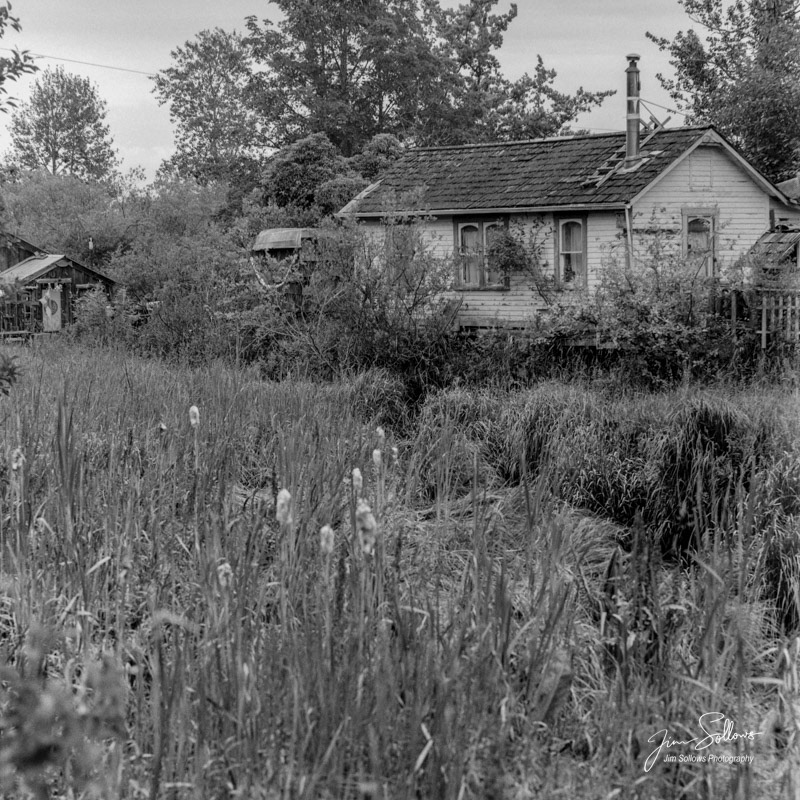
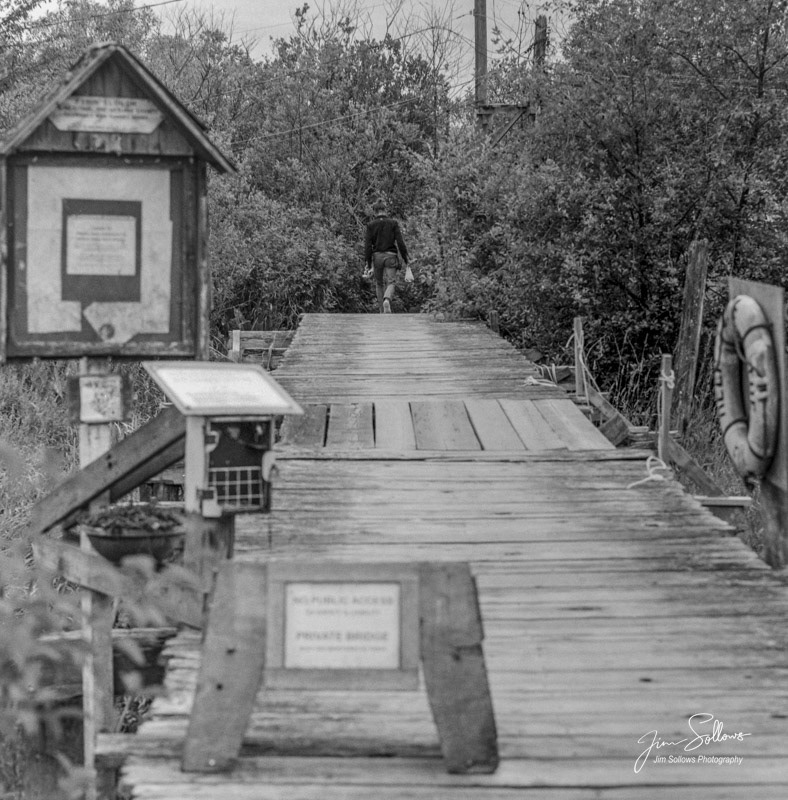
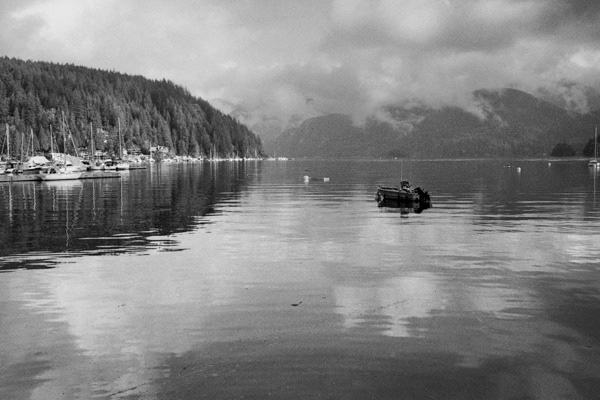
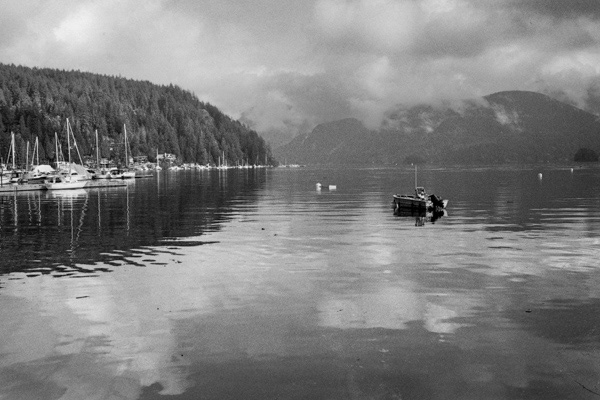
Nestled on the banks of the Fraser River in Steveston, British Columbia Canada, there is a very unique and picturesque little fishing village known as Finn Slough. Its story is one of history, resilience, and community spirit that has defined the area for over a century.
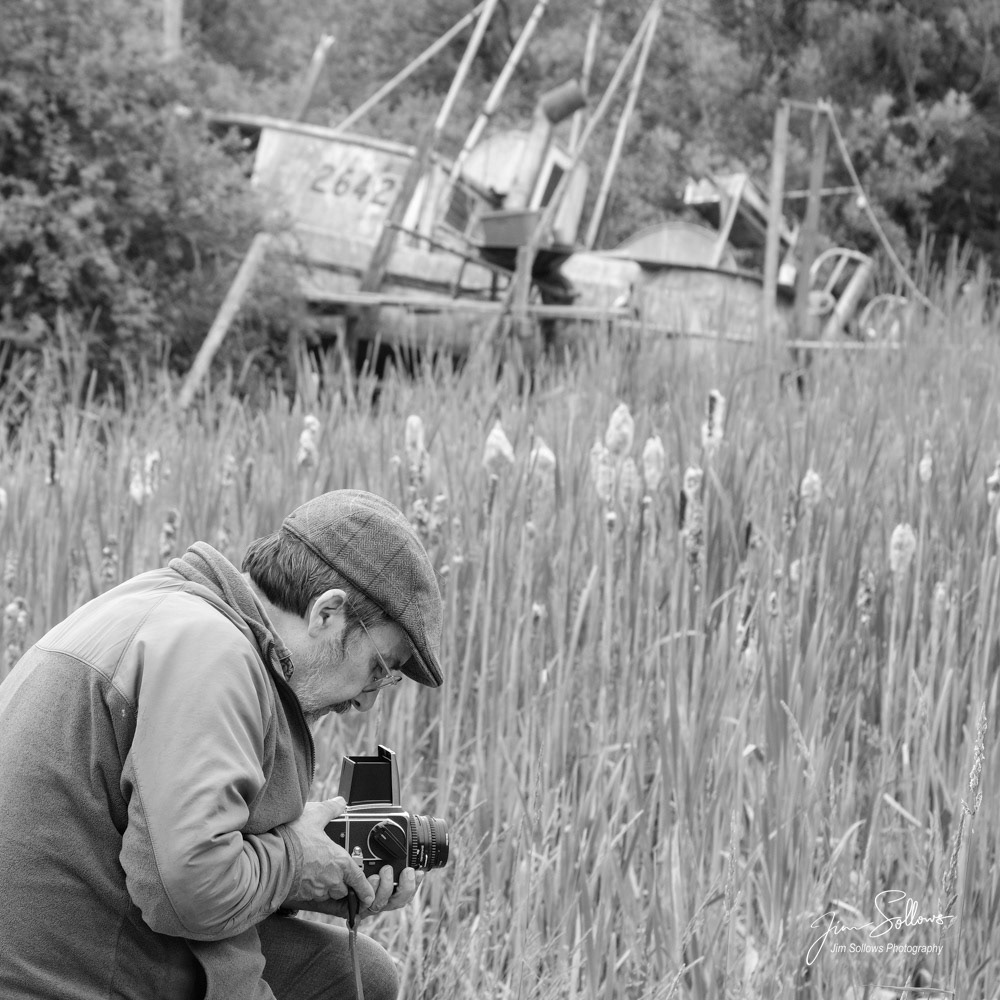
I ventured out there this week, to document this most fascinating community. Most of the photos below were taken with a Hasselblad 500 cm on Ilford HP5 medium format film. The residents are very private but I managed to talk with one fellow who has lived in the Slough for “many years”. Unfortunately he declined to be named or have his photo taken but the time he spent with me was invaluable as there is little documentation about the Slough.
Finn Slough traces its origins back to the late 1800’s when Scandinavian and Irish settlers arrived in Steveston, seeking opportunities in the growing fishing industry. The village became a hub of activity, with its wooden houses perched on stilts above the muddy inter-tidal marshland.
The name “Finn Slough” originates from the Finnish settlers who called this place home. They were primarily fishermen, drawn to the abundant salmon runs in the Fraser River. The Finnish community grew, and soon, other European immigrants joined them. Together, they built a tight-knit community bound by their shared passion for fishing and the river.
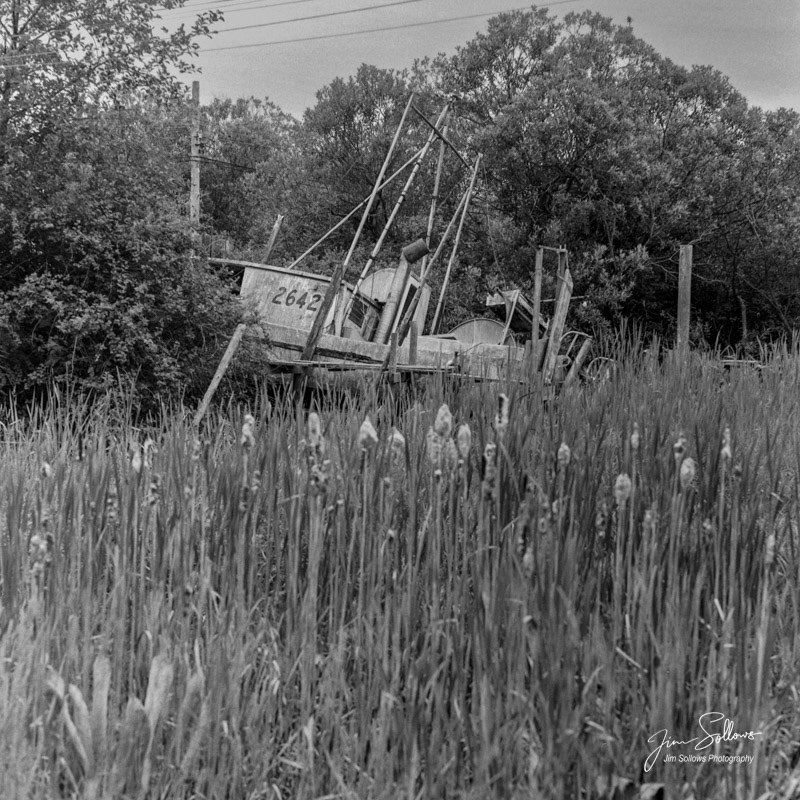
In those early years, Finn Slough thrived, with fishing boats dotting the river and the sound of seagulls filling the air. Families would gather on the docks, repairing nets and preparing for the next catch. Life revolved around the tides, the seasons, and the unpredictable nature of the river.
However, as time passed, the modern world began to encroach upon the quiet haven of Finn Slough. Industrialization, urban development, and changes in the fishing industry brought challenges to the community. The once-bustling fishing village found itself facing a decline in fish stocks, stricter regulations, and pressure from land developers eager to claim the waterfront area.
Despite these challenges, the residents of Finn Slough refuse to let their beloved village fade into obscurity. They banded together, forming the Finn Slough Heritage and Wetland Society in the 1980’s, to preserve their unique way of life and protect the marshland that serves as home for both residents and wildlife alike.
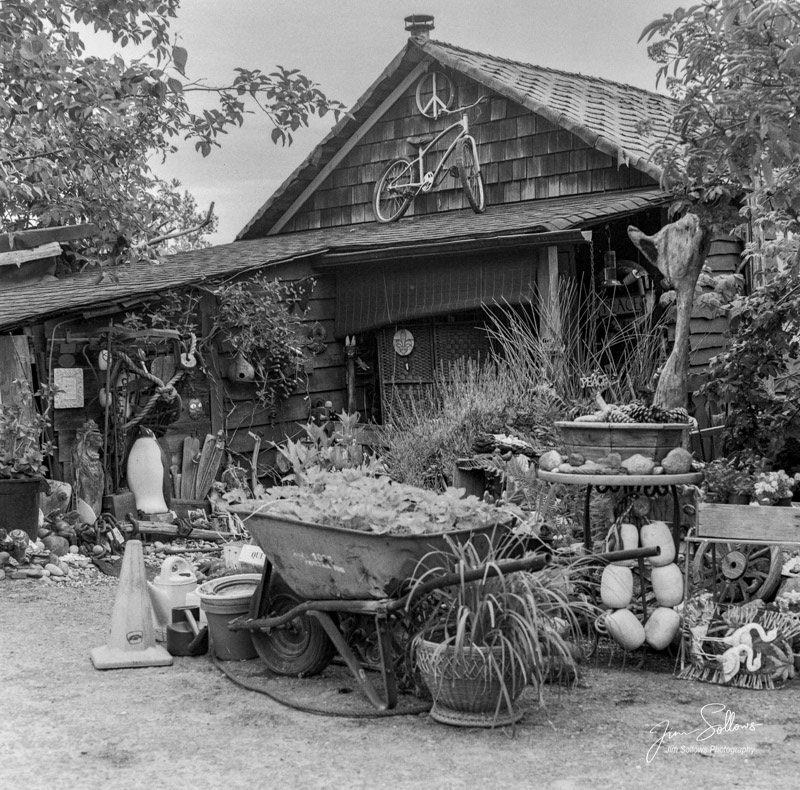
Over the years, Finn Slough has become a symbol of resistance and a haven for artists, environmentalists, and nature lovers. Its ramshackle buildings, weathered and worn, exude a rustic charm that continues to draw visitors from far and wide. The village has served as an inspiration for painters, photographers, and writers, capturing its timeless beauty and celebrating its historical significance.
Today, Finn Slough stands as a living testament to the resilience of its community. Its wooden structures, held together by the collective efforts of its residents, continues to defy the passage of time.
Finn Slough tends to be very private, and no trespassing signs abound. However, visitors can freely stroll the road adjacent to the village to admire the unique architecture, and appreciate the peaceful serenity of the marshland. On occasion, I’ve encountered residents who are more than willing to share stories of the community past and present.
Finn Slough is a reminder that even in the face of change, some places hold steadfast to their roots. It’s a special place where the past and the present harmoniously coexist. As the sun sets over the Fraser River, casting a warm glow upon the village, the story of Finn Slough continues to unfold, inviting future generations to write their own chapters in its remarkable history.
I’ve spent a bit part of my life working and teaching in the field of emergency health care. This day I was teaching a particular course that has a well earned reputation for being very intense. The subjects are complex, time is short and patients lives are at stake. I had a student in the class who was younger than most, but very quiet and reserved. Each day students would scatter like ants when I released them for lunch. One day I saw Donovan sitting alone in an unoccupied classroom with the lights off. He was hunched over an old leather bound book by the light of a window. He appeared to be writing or drawing. I quietly entered and asked if everything was ok. He looked up and smiled, offering to show me what he was working on. The old book with its well worn pages, was a collection of varied and beautiful pencil sketches. He explained that in times of stress or pressure, he likes to sketch. He explained that his art helps him to focus and clear his mind for the demands ahead.
The circumstances that paramedics, ER nurses and physicians face each day, take their toll, and for many the cumulative effect over time becomes too much. There are so many in this field that have walked away from their career or been driven to self destruction and even suicide due to the effects of Post Traumatic Stress Disorder. I’ve somehow escaped that same fate, due in no small part to my own “art”. There were many times when I would come home from work, numb from the stress and long hours demanding everything I have till there was nothing left. I would often grab my camera (my art) and just go shoot photos .. any photos …the subject didn’t matter. Looking through the viewfinder and composing my shot, gave me a brief respite from the stresses of my work. In short order I returned back to the real world and put my camera back in its closet. Nothing had really changed, but that brief interlude gave me a much needed break. It calmed my thoughts and helped me to focus and clear my mind to face another day.
As I watched Donavan sketch, I put my hand on his shoulder and told him “Never let that go! It’s your life preserver that will keep you afloat through the rough times”. I asked if he would mind if I shot a quick portrait to remember that moment. He said “sure” and quietly returned to his book. I shot this single frame and left him to his peace.
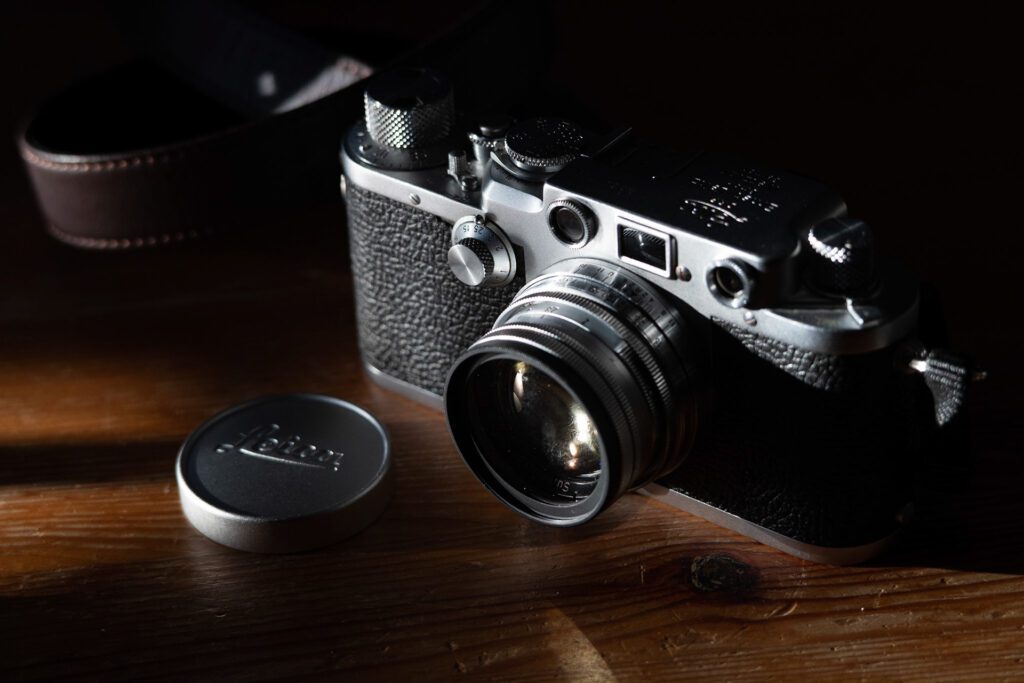
This is a photo of a camera but not just any camera. It’s one that is very special to me. Not just because it’s gorgeous and takes beautiful photos. Not just because Leica was the pioneer in 35mm photography, but much more than that. This camera saved lives, so many lives! It’s not just a camera it’s symbol of freedom from tyranny!
Let’s go back in time to 1933. Adolph Hitler has been named chancellor of Germany and Ernst Leitz headed a German company, Leitz Inc, that was an internationally recognized brand that reflected credit on Germany. The company produced very high quality cameras, range-finders and other optical systems used by so many around the world, including the German military. In addition, the cash hungry Nazi government desperately needed income from abroad and Leitz’s single biggest market for their optical equipment was the cash rich United States. Leitz was a powerful man, and Leitz Inc (Leica) was a company that was essential to the German economy and military.
As Hitler ramped up his reign of terror, Leitz began to receive calls for help from Jewish employees and associates. They were asking Leitz to help get them, and their families, out of Hitlers reach. Leitz despised the Nazi’s and feared what was happening to his country. He knew he had to help, but how? Leitz soon established a system to covertly get Jews out of Germany under the pretence of being Leica employees that were being assigned to Leitz offices in France, Britain, Hong Kong, Canada and the United States.
To add credibility to their story, each employee was given a Leica III much like the one in the photo above. These cameras were considered to be the best in the world and as such they were very expensive! Anyone carrying one had to either be very wealthy, or an official representative of Leica. These families had to leave everything behind, so they left Germany with only what could fit in a suitcase. Leitz directed that once relocated, they could sell the camera to provide them with financial resources to rebuild their lives in their new home. In addition they were paid a stipend by Leica until they became established and could support themselves. Many continued to actually work for Leica in their new country, working as repair technicians, sales representatives and management.
This rescue effort wasn’t without cost. Members of the Leitz family and firm suffered for their good works. A top executive, Alfred Turk, was jailed for working to help Jews, and freed only after Leitz paid a substantial bribe. Leitz’s daughter Elsie, was imprisoned by the Gestapo after she was caught at the border, helping Jewish women cross into Switzerland . She eventually was freed but endured torture in the course of questioning. She also fell under suspicion when she attempted to improve the living conditions of 700 to 800 Ukrainian slave labourers during the 1940s.
The story of the Leica Freedom Train was kept quiet as the Leitz family wanted no reward or acknowledgement. Leitz felt they simply did what was necessary and that so many sacrificed so much more.
Every time I use my Leica III, I think of the other photographers that have used this camera over the many decades. Who were they? What were their stories? I’m only one photographer in a long chain and one day it will move to its next caretaker.
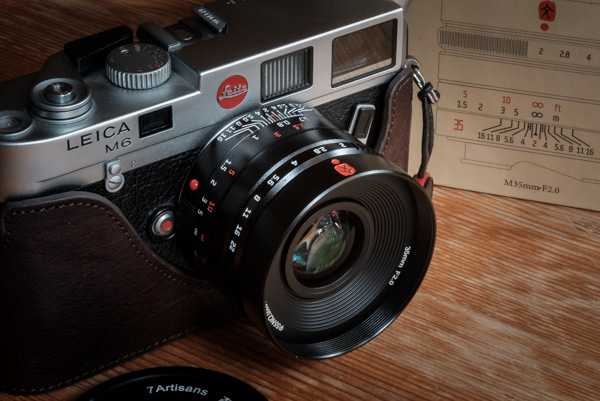
In mid October a lens arrived from 7Artisans. They had asked me to review their newest 35mm f2 lens for Leica M mount. I’m a Leica photographer, so I didn’t want to do your typical “unboxing” review. I wanted to really see how it stacks up against a Leica Summilux 35mm and Voightlander Skopar 35mm. 7Artisans simply asked for my opinion and have given me absolute freedom to say anything I want about this lens .. good or bad. My Leica M6 with the 7Artisans 35mm f2 has not left my side side for the past couple weeks. I’ve subjected it to both in-studio and field testing during that period. I’ve done side by side testing to evaluate sharpness and overall image quality in comparison to the other lenses. Now please understand that these are not scientific tests. If you are looking for a lot of graphs, charts and terms like “angle of incidence” and “lens conjugate ratios”, you might as well read no further because to be honest, I don’t care about that stuff. I only care about how the lens renders my images. These are purely subjective comparisons to evaluate the lens from my own perspective and for my usage as a photographer.
Build Quality
From the moment I saw the box, I realized this is not your typical 3rd party lens. The cardboard box is a work of art itself. It’s beautifully designed with a cool magnetic closure. Inside the box, the lens comes in a beautiful brown leather case. I’m not sure if it’s real leather but it certainly looks classy. You rarely see this attention to detail in most other brands. The lens itself feels solid, being entirely metal and glass. The focus is super smooth and the aperture ring is something I’ve never encountered before. I have lenses that are “unclicked” .. you move smoothly from one end of the scale to the other without interruption. I also have “clicked” lenses where the aperture snaps from one f-stop to the next. This lens is somewhere in the middle. It’s smooth and silky like an unclicked lens, but there are still subtle detents you can feel at each aperture setting. If I want to go from f8 to f5.6 without taking my eye from the viewfinder, I can do that because there is a subtle click at each f-stop. However if I want my aperture to be somewhere between f5.6 and f8 I can do that too. I’ve actually sat here just playing with that aperture ring, it’s so amazing. I’ve never seen or felt anything like it, and I hope to see more lens designs do this in the future, it’s a brilliant design.
Focus Calibration
Leica M mount 7Artisans lenses come shipped with a paper focus scale and a little screw driver that can be used to “calibrate” your focus. For starters let me say … if you are mounting this lens on a digital body that offers through-the-lens focusing .. disregard. Just mount your lens and you’re good to go. This really applies to those of us mounting the lens on a rangefinder body, that does not focus through the lens. If you find there is a discrepancy between your camera rangefinder and the numbers on the lens body, you can calibrate the focus scale part of the lens to match your rangefinder. I put this new lens on my M6, walked outside and focused on a tree branch half a km away. I checked the lens body and it was showing I was at infinity. If it was showing anything else I might need to tweak the focus but mine was perfect. Purely out of curiosity I decided to also check the close focus and used the method that 7Artisans suggests on the instructions in the box. The lens was perfectly accurate here as well, so I had no need for any adjustment. I suspect most people will not need to adjust their focus, but you can if you need to.
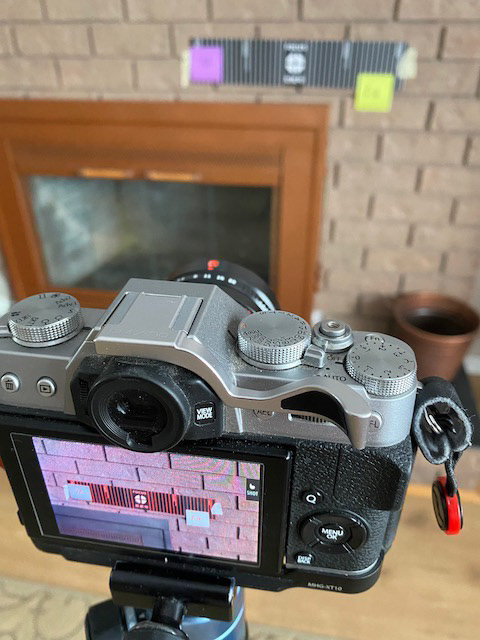
Sharpness Testing
I mounted my digital camera on a tripod and compared the 7Artisans 35mm against a Leica Summilux 35mm, Fuji XF35mm and Voightlander Skopar 35mm. A focus pattern was mounted on a brick wall. The brick mortar allowed me to look for curvature distortion and also enabled me to look at focus in the corners by looking at the grain of the brick. In a second round of testing I also stuck a small card of fine print on the wall in the top left corner of the frame, so I could use the fine print to help evaluate corner sharpness. Images were shot at every aperture so I could compare each lens at every aperture setting.
They ranked as follows:
#1 Fujifilm XF35 f2
#2 Leica Summilux 35
#3 7Artisans 35 f2
#4 Voightlander 35
The results with the Fujifilm lens was not a surprise. Fuji lenses are amazing quality. Most of the worlds major motion picture’s are shot on Fuji lenses for this reason. In this case the Fuji lens was primarily used as a baseline standard to assist in evaluating the other lenses. Having finished the testing, even as I write this, I still have trouble with the ranking of the 7Artisans and Summilux because they were so incredibly close in the testing I conducted. I think the Summilux was ever so slightly sharper in the extreme corners, but it was a very small difference only noticable at significant magnification In Lightroom. The Voightlander lens was visibly less sharp over all by comparison to the others, but still a fine lens at normal magnification.
Real Use Testing
I shot 3 rolls consisting of Ilford FP4 and HP5. The rolls consisted of frames where the same scene was shot with each of the lenses and the exact same settings on each. They were then compared side by side and ranked in order of preference. The three lenses compared here were the 7Artisans 35mm, Leica Summilux 35mm and Voightlander Skopar 35mm. The Fujifilm XF35 was not included as this was a film test, not digital. The camera body used for this test was my own Leica M6, a camera I’ve shot for years and can trust the results.
The 7Artisans and Leica Summilux were pretty much identical for sharpness in normal view. There were some very subtle differences in contrast. It’s going to be difficult to truly compare the images below in the low resolution needed for online presentation, but it will give you a rough idea of what I saw in the darkroom.
Leica Summilux 250 f87Artisans 250 f8
Magnified, the Leica Summilux appeared ever so slightly sharper in the corners on some photos but it was very close, and again this was only visible under magnification. The 7Artisans seemed to have slightly more contrast which I quite like.
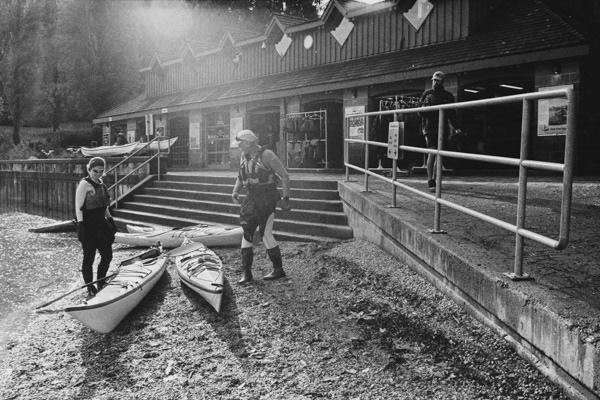
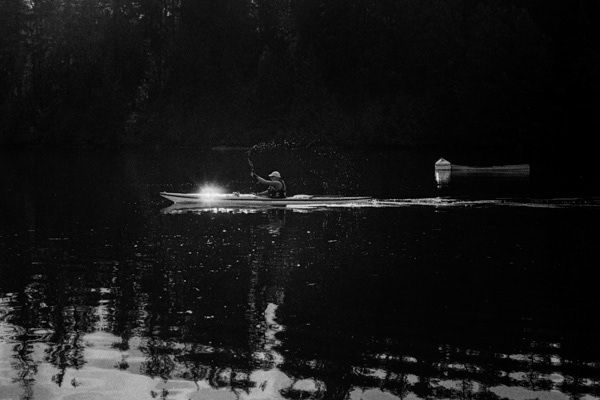
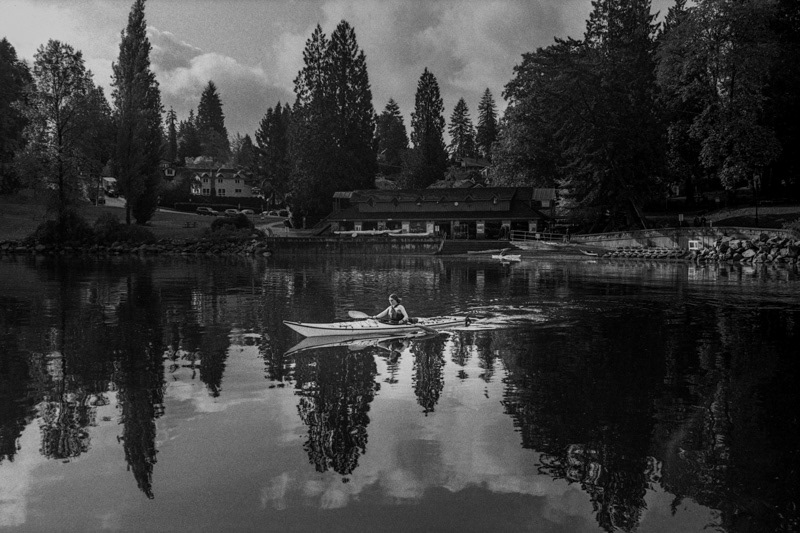
There was an issue with the 7Artisans in that it tends to flare quite a bit when shooting into direct, or near direct sunlight. This flare actually rendered some images unusable. The Leica Summilux on the other hand had barely noticeable flare under the same conditions. My first reaction was that this is a problem. However, then I looked at the flared image of the Kayak shop below, an image I had previously dismissed as trash. Something I didn’t expect happened … I actually found I like the flare in this photo! It’s smooth, and gives a very unique etherial quality to the image. In the second shot below you can see the flare caused by reflection of the sun off the deck of the kayak. It’s actually a beautiful effect. In other words, yes the lens flares, but I tend to consider this an artistic characteristic of the lens.
My final conclusions will be regarding the 7Artisans and Leica lenses specifically, as the Voightlander was visibly outperformed by both these lenses. In most situations I actually had difficulty determining if a shot was taken on the Leica Summilux or the 7Artisans, they are that close. Fortunately I kept detailed notes on each frame shot because in so many cases, that was the only way to identify one from the other. Let me be honest. The Leica Summilux is a gorgeous world-class-lens, but it should be, as the current price of them on the used market is roughly $5000 Cdn. The 7Artisans is only $400 Cdn new, so less than 10% of the price. I find it amazing that the performance of both lenses was so close given such a price difference. The thing that really sets them apart is the flare issue. The 7Artisans 35mm can produce a very artistic flare effect that would be extremely difficult to achieve otherwise. In fact two of my favourite images from the shoot, are the above ones with flare. I will be inclined to use this lens with a hood to minimize flare but I fully intend to throw caution to the wind on occasion and point my lens in the direction of the sun to see what results. In some cases that flare can be magic! As I’ve already said, it’s amazing to see how well the 7Artisans 35mm performed compared to the Summilux. In fact I simply would not have believed it if I had not done these tests for myself. The 7Artisans 35mm f2 is a wonderful lens, and one I will add to my own kit for use over the long term. You can find more information at the 7Artisans web site when the lens is released on November 7th.
The final image below is my favourite from the past two weeks of testing. It was shot with the 7Artisans 35mm F2 WEN lens on my Leica M6 with Ilford HP5 film.
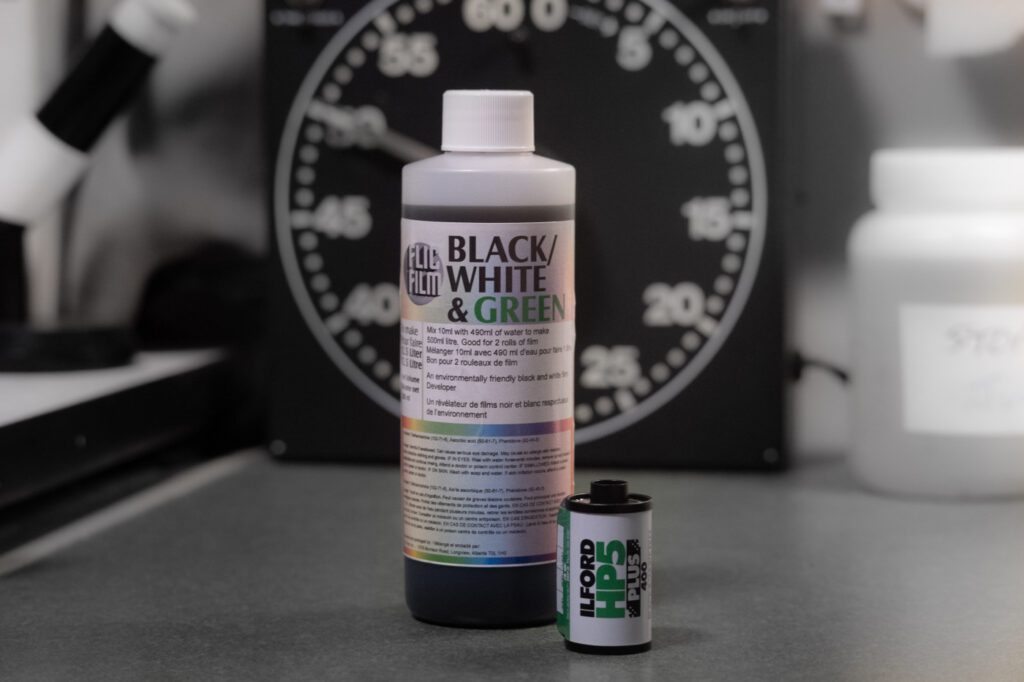
I’m a long time Ilford guy! I’ve used Ilford black and white chemistry as far back as I can remember. I decided to try Black/White Green for a couple reasons. For starters, it’s a Canadian product and I’m all for supporting new film photography businesses, especially domestic ones … as long as they make products that measure up to the competition. The second reason is that this new developer is called Black/White & GREEN because it’s environmentally friendly. In fact the main ingredient used is Vitamin C. Another component is an emulsifier found in hand cream. When you are finished processing your film, you could feel safe tossing it down the drain or even into your garden! It’s also safe for those with septic systems. That’s pretty unique, but how does it measure up to my everyday chemicals, namely Ilford Ilfosol 3 or my good old Swiss Army Knife of developers … Rodinal?
Image Quality:
I processed a roll of Ilford HP5 and found the results are comparable to Ilfosol 3. It had very similar grain and contrast levels. I don’t use Rodinal as often, as it tends to be a little grainier. I do use it when working with very old films or large format where grain is less significant so Ilfosol 3 is my main developer and BW&G is very comparable in image quality.
There are other factors to consider:
Shelf Life:
This has never been a big issue for me because I tend to use my chemicals long before they expire. FlicFilm didn’t provide any specifics but in conversation with Dave Marshall, president of FlicFilm, he said “It should have a very long shelf life, much like Rodinal”. He didn’t elaborate beyond that but the shelf life of Rodinal is measured in decades. In fact a few years ago I tried remnants of a bottle of 60 year old Rodinal and it worked as good as fresh. I don’t know if BW&G will last that long but it sounds similar in that it can be stored on a shelf and last a long time. This is the kind of thing that most home film processing folks want to hear. Most of us just won’t get out money worth out of a developer whose life is measured in weeks as opposed to months or years.
Cost:
At $22 for a 250ml a bottle, it’s not the cheapest developer. By comparison, Ilfosol 3 is $16 a bottle for a 500ml bottle. However we can’t stop there because BW&G is used at a tiny 1:49 dilution where I use Ilfosol 3 at 1:14. Based on processing single rolls of 35mm, the BW&G will process 40+ rolls, which works out to 55 cents per roll. The larger bottle of Ilfosol 3 will only process 23 rolls which results in a per roll cost of 70 cents. That’s not a big difference but it add’s up over time. There are other dilution ratios that can be used with Ilfosol 3 but for the purpose of this post I’m using 1:14 as it’ one of the most common, and also what I personally use.
Ease of Use:
Ilfosol 3 comes in liquid form and is very easily mixed with water to make your working strength developer. I was surprised the first time I tried to mix BW&G. I was expecting a similar liquid developer concentrate, but instead I discovered that it has a thick consistency similar to syrup or honey. Pouring the concentrate developer into a graduate cylinder small enough to measure out 6ml proved to be a challenge. Perhaps I should more accurately state that getting the concentrate out of the graduate and into the beaker of water was a bigger challenge. I was eventually able to get the thick developer fully out of the graduate by rocking working strength back into the graduate and then back into the working strength beaker. By pouring the working strength developer back and forth from the beaker to graduate and then graduate to beaker, several times, I was eventually able to get all the syrup out. Once the concentrate was in the beaker it tended to sit in a lump on the bottom of the water filled beaker. Fortunately in my darkroom I have a magnetic stirrer that quickly resolved that situation and thoroughly mixed the concentrate. If you don’t have such a device, you will be stirring by hand to get the concentrate properly mixed. My recommendation would be to pour your water and concentrate into a bottle with a lid, rather than an open top beaker. That way you could put on the lid and like mixing a martini, a few quick shakes would properly mix your chemical.
Summary:
Will I be switching to BW&G. No, but not because there is anything wrong with it. It’s a nice developer and it works very well! I love that it lasts like Rodinal and is very inexpensive yet gives the finer grain of Ilfosol 3. However, I’ve been using Ilfosol 3 for a long time and it’s readily available at my local camera shop a few minutes from home, so it will remain my main developer of choice.
Would I recommend BW&G for someone starting out? Absolutely! It’s very inexpensive, it’s wonderfully environmentally friendly and it doesn’t need to be stored in air tight containers. You just put the cap back on the bottle and stick it on your shelf. You don’t have to worry about it expiring, it will last a long time. The syrup aspect is a minor annoyance but if you pour the concentrate into a capped bottle with water, and then shake, this becomes less of an issue.
It’s a great developer and one I will absolutely be recommending to my students!
I’ve found a way around the measuring issue mentioned above. Use a digital scale that is able to measure in millilitres. You place the large 500ml beaker on the scale and zero the scale. Add your concentrate, 6ml for one roll in my example, then top up the beaker with water to the desired volume .. all using the scale, it works perfectly and totally addresses the syrup problem I mentioned in the article.
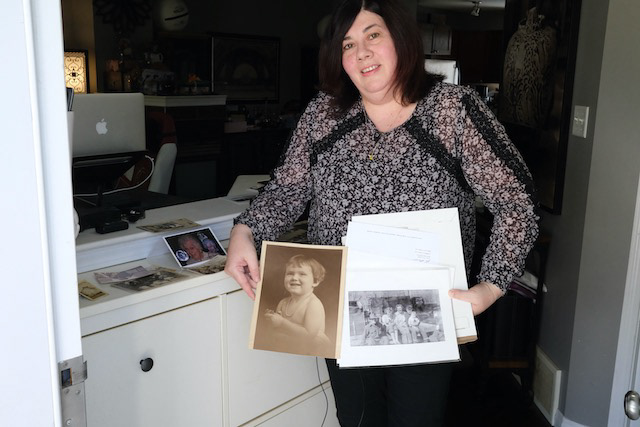
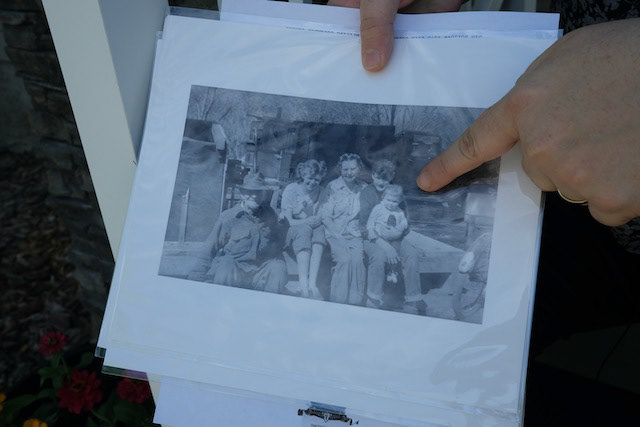
t was back in April 2022 when I came into possession of an old roll of film in an antique shop. I wrote a blog post about that film and all that went into developing it and the 3 amazing prints that resulted. A lot has happened since then and a follow up post needed to be written to complete the story. If you haven’t read the first instalment, you should do that HERE before going on.
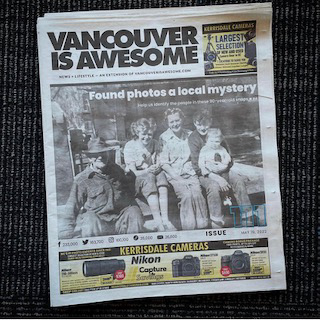
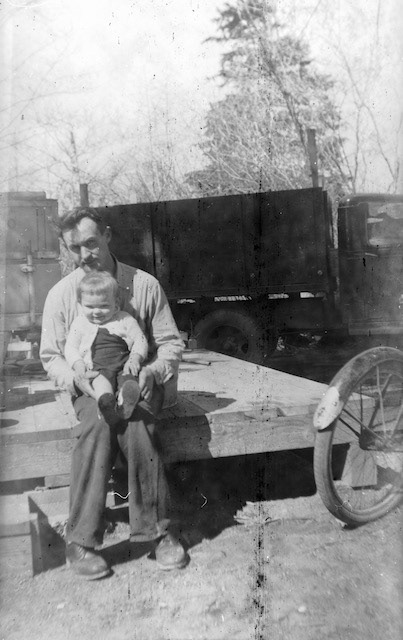
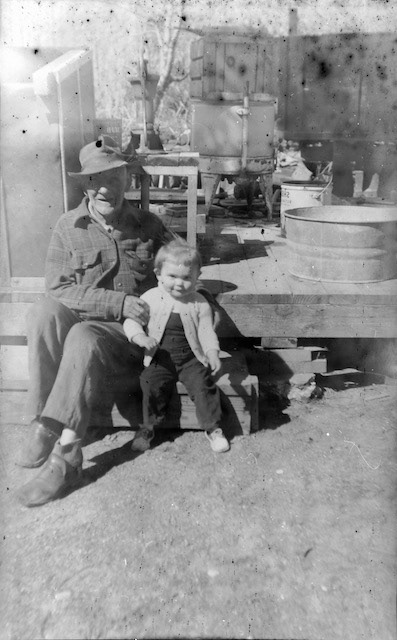
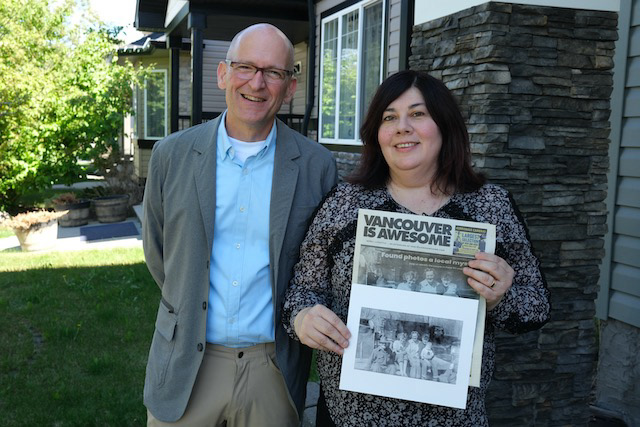
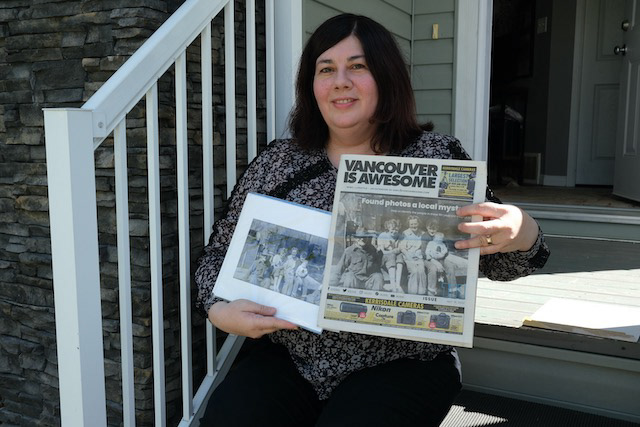
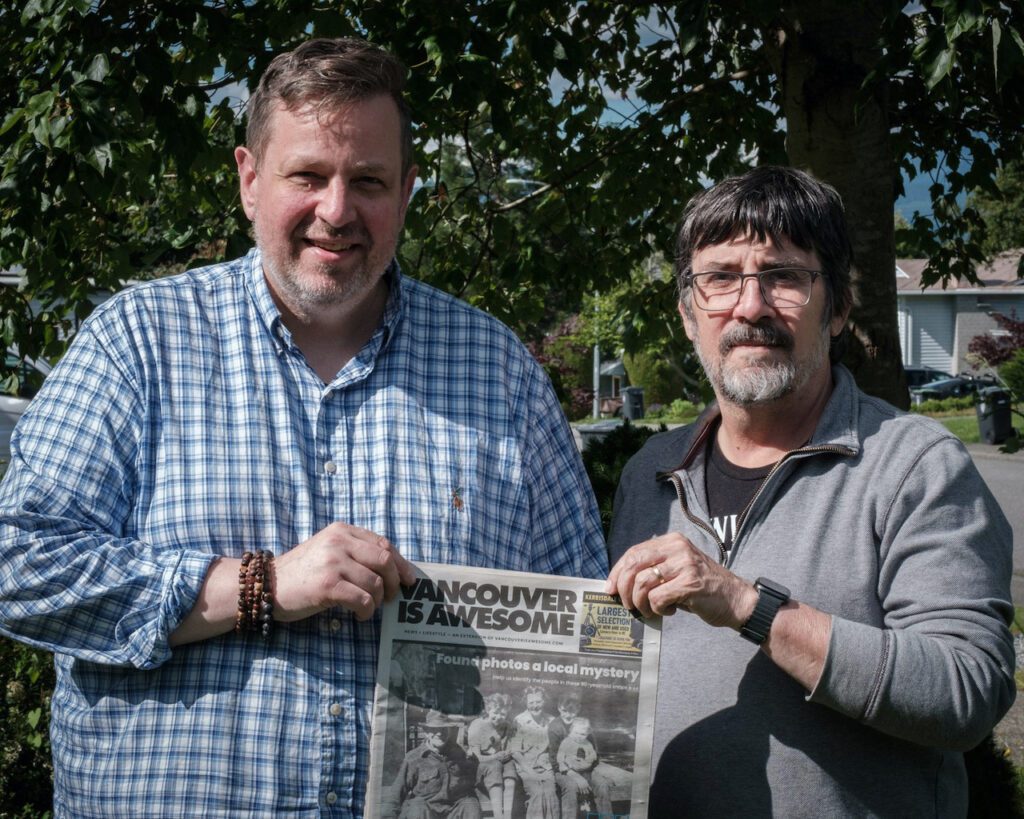
The film had been developed and we have some very old photos that appeared to be around the 1930’s or 1940’s but there was little to go on. I posted them here on my web site and also on my Facebook page. It generated a lot of interest but nothing compared to what was about to happen. It was around this time that my good friend and fellow photographer Steve Bueckert came into the picture. We were chatting one day and Steve suggested, “We really need to try and find these people or at least get more information. What we need is bigger circulation”. Steve went on to tell me about a friend who was a Vancouver newspaper editor. We contacted Bob Kronbauer at Vancouver is Awesome, a publication that circulates news about happenings around the city. Bob instantly took an interest in the story and arranged for an interview with reporter Brendan Kergin. Brendan listened to the story, asked a lot of questions and gathered the pictures. Next thing that happened was that the story not only appeared in the newspaper but it appeared front page. The article invited readers to contact me by social media or my web site if they knew who these people were or could shed more light.
The day the newspaper hit the streets, messages began to arrive. Some of the comments were nothing more than guesswork and a few that were less than helpful. There were also comments from people that identified aspects of the photos that we had not considered. We were even contacted by people who had some real knowledge of the time and offered valuable insights. Each day as new tips came in, Steve and I would discuss the information. We gradually started to assemble more information about the scene. Occasionally new information would add clarity that required us to toss previous assumptions. Here are a few of the things we learned along the way.
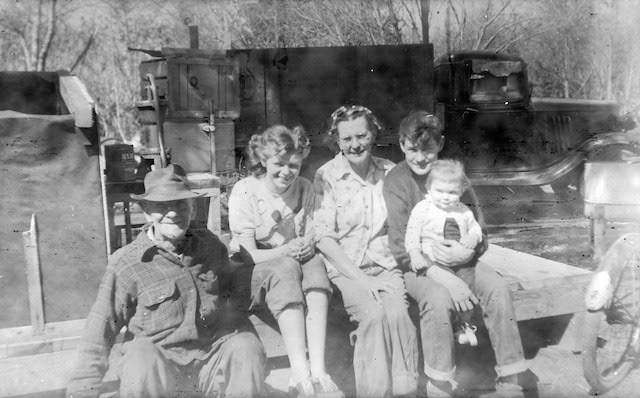
The old truck shown in a couple of the photos was common in British Columbia around the 1920’s-1930’s and was usually used in agriculture or logging and was especially common in farming on the south coast.
The bicycle tire shown in one shot is vulcanized rubber that was common in that same period
There is an old wringer washing machine that dates to the early 1920’s
In the background of a couple shots is an MJB coffee can with a logo that was in use in the 1920’s
One of the young women in a photo is wearing a shirt that appears to bear and Flash Gordon graphic. Flash Gordon wasn’t released until the mid 1930’s
Based on the hundreds of tips that came in, we were pretty sure these photos had originated in the mid to late 1920’s, but we still didn’t know anything about the people or where.
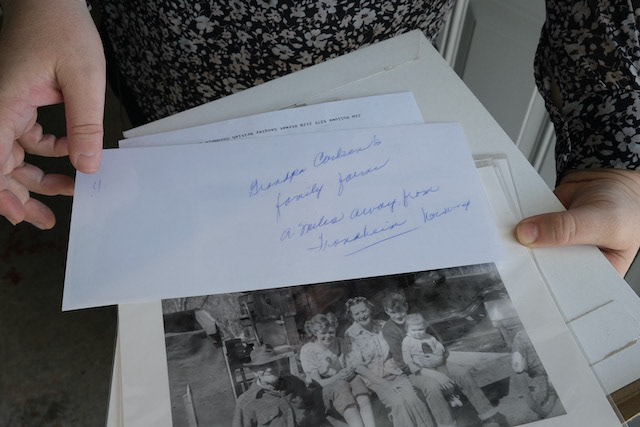
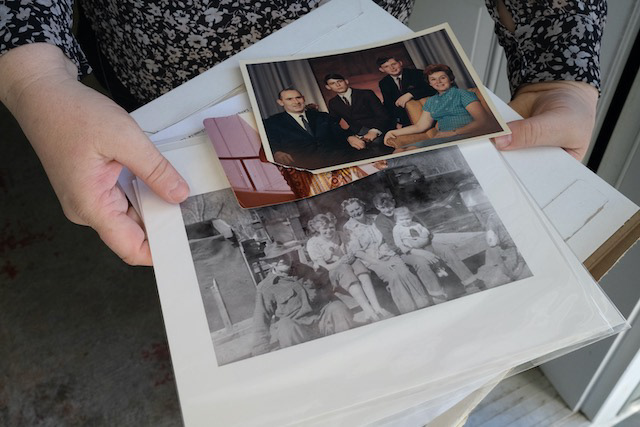
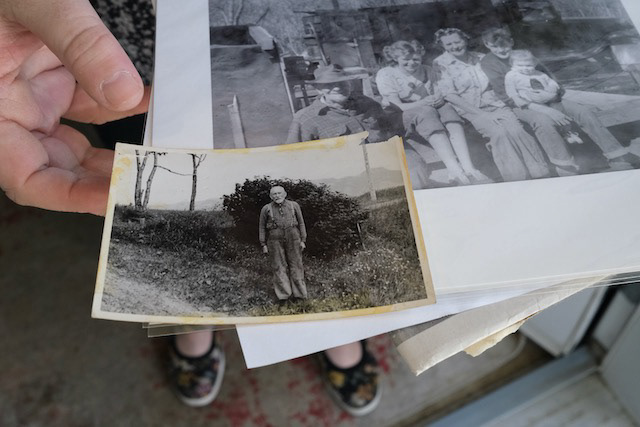
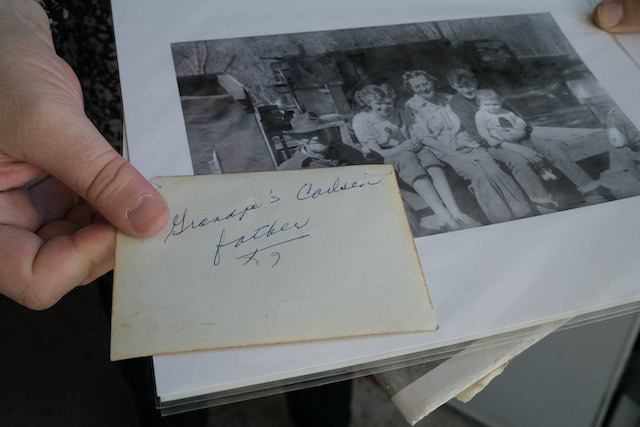
One day I received a message that changed everything. A lady in Edmonton, named Pamela, said she was looking at the story in a local paper and instantly recognized the little toddler in a couple photos as being a childhood photo of her Grandmother. The little Toddler was her grandmother Lorraine who was born in 1924 and Pamela said her picture was unmistakable and a perfect match to others she had. To further confirm we had the right person, Pamela was able to identify all the other individuals in the photos including that of her Great Great Grandfather John Ivor Carlson and his wife Great Great Grandmother Jerti Carlson. She had been working on a family tree at the time the newspaper story came out and happened to have other photos of these very same people. They were all a match.
We exchanged messages back and forth with Pamela for a few days, adding details as Pamela worked through her archive of old family photos and notations on the back of many. By now the article had appeared in 22 newspapers across Canada, USA and even UK. I resisted the urge to just tell everyone the mystery had been solved. We still had a piece of the puzzle that just didn’t fit. How could Hjerdis be wearing a Flash Gordon shirt for a movie that won’t be released for another ten years?
One day a message came in from a sports historian who specializes in Olympic memorabilia. He said “I know exactly where that shirt came from. It was released as part of the 1924 Winter Olympics in Chamonix France. It’s not Flash Gordon, it’s actually a graphic of a freestyle skater. With this, the last piece of the puzzle fell into place.
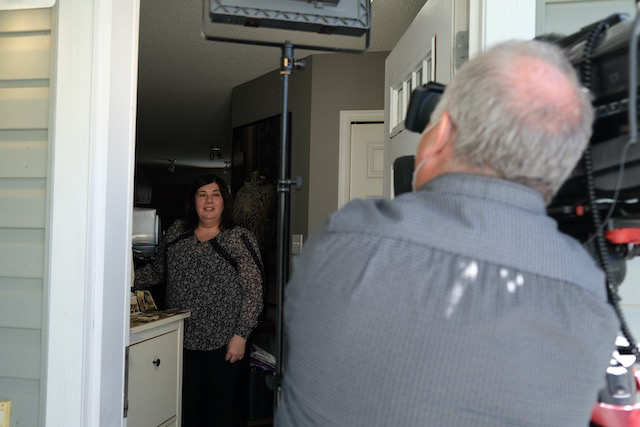
Steve and I were extremely excited, we couldn’t believe we had actually managed to identify these people. The last step was to deliver a set of original prints to Pamela in Edmonton. I thought I could just print them and ship to her in the mail. Steve said “Hey, I have a friend who is also a photographer in Edmonton who I’m sure will help us out!” Steve contacted Owen Law who eagerly offered to assist. We arranged to print the photos and mail them to Owen. Owen would then hand deliver the prints to Pamela, and shoot some photos of her receiving them.
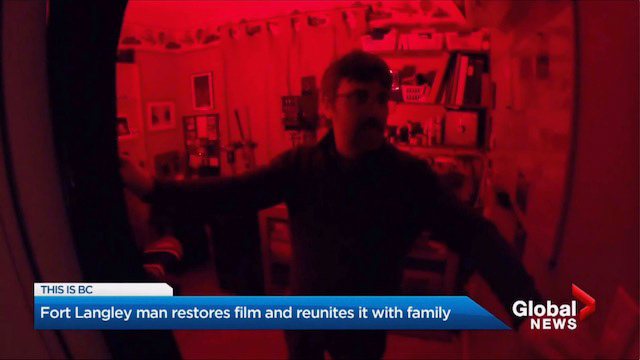
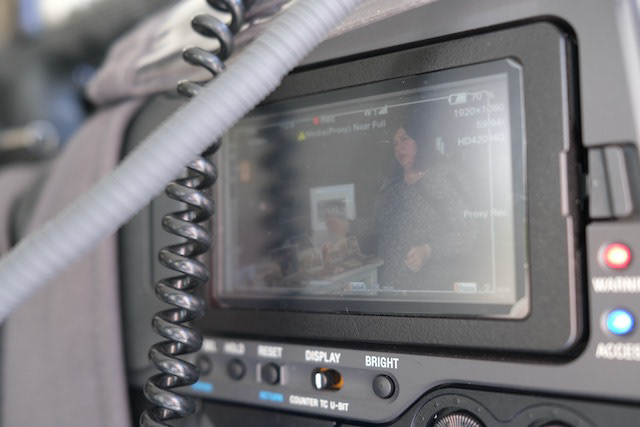
While planning for the print delivery to Owen, I was contacted by Jay Durant, reporter and news anchor from Global News. Global is a major nationwide Canadian TV news service. Jay asked how the search was going and when I explained the findings, he said “We really need to do a story on this!” Within a mater of days I had Jay Durant, TV Cameras and lights occupying my home and even crammed into my darkroom. Jay interviewed me and asked me to explain the process of recovering the film. Sadly Steve was working and unable to be part of the Global interview. I regret that he wasn’t there because his role in this project was just as significant as my own. However Jay was able to arrange for a Global News camera crew from their Edmonton office to accompany Owen when he delivered the photos to Pamela. At one point I said to Jay, “I can’t believe Global is putting so much effort into this little story!”. Jay quickly responded and said “Actually this will be the story people will remember the next day. There is so much bad news that people need to hear this”. When the show aired the following week, it was positioned right at the end of the newscast, to end on a positive note.
Click to view the Global News Story
This brings to a close, the story of the Verichrome Film. We started with an unknown roll of old film in an antique shop and not only recovered wonderful old photos, but put them back into the hands of the descendants where they belong. Moral of the story, never never never toss away an old roll of film. You never know what piece of history will be lost forever if you do!
I want to offer my personal thanks to the team that made this project possible. This includes Shari Sollows, my wife who was with me the day we found the film and whose tenacious enthusiasm for solving puzzles kept us motivated. Steve Bueckert who was the brains behind the news & social media aspects, and without whom this story would never have been seen by Pamela. Owen Law in Edmonton played a such a very important part when he eagerly volunteered his time and efforts facilitating the final hand over of prints to Pamela in person and being a liaison with the Edmonton Global TV crew. The last photos in the set are Owen and Pamela and the final one is Steve and Jim. Owen passed his camera to the Global cameraman and asked him to take the shot. It’s a wonderful photo to end this story.
Here are a few photos capturing the day the prints were delivered to Pamela in Edmonton.